
Modular Haiku Comics Workshop, by Laura Varnam & Kristen Haas Curtis
This two-part workshop, using poetry and comics to adapt a source text, was devised by Laura & Kristen in 2023 and is made freely available via the Guild of Medievalist Makers website for personal use as well as for your classroom or writing group.
Using basic materials that you likely have on hand, this blog post leads you through the steps of the workshop. No poetic or artistic skill is required- just your curiosity and willingness to play!
The workshop highlights two of our shared academic preoccupations: creative play as research method and the possibility of academic joy! We have designed this exercise to help you have fun with your source text in an extremely low-stakes manner: a series of timed steps moves quickly, encouraging you to trust your instincts rather than second-guess yourself. Please remember that making an adaptation does NOT oblige you to share it. This exercise has value even if no one sees the adaptation you create because the creation process itself will have turned your critical eye in a new direction!
Structure of the Workshop
The workshop is divided into two parts, ‘text’ (30 mins) and ‘image’ (20 mins).
Part I: Time to Write (30 minutes)
Part II: Time to Draw (20 minutes)
Plus 10 minutes to reflect at the end.
You can run both parts of the workshop separately if you choose.
Materials
2-3 sheets of blank paper
A pen
Square post-it notes (any color)
Scissors and a glue stick or tape. For both parts of the workshop, you can have your source text to hand or you can work from memory. (The emphasis is on speed and quantity, not quality at this stage, so you may find that having the source text to hand does not enable this kind of quick play).
Part I: Time to Write
This part of the workshop is based on the short Japanese poems called HAIKU.
Steps 1-3: 15 minutes. Step 4: 15 minutes writing time.
Step 1. Read this definition of haiku (5 minutes)
Haiku is a Japanese form: made up of three unrhymed lines of five, seven, and five syllables (seventeen syllables in total).
Often features an image or pair of images meant to depict the essence or mood of a specific moment in time.
Emphasis on economy, often refers to seasons/nature.
Often includes a word that makes you think or pause.
Stephen T Ziliak, Haiku Economics on Poetry Foundation: ‘each poem is the length of about one human breath.’
Step 2. Examples of haiku (5 minutes)
Examples might include haiku by the Japanese masters Basho and Issa. For example:

Note that translated Japanese haiku often do not follow the 17 syllable count!
The Poetry Foundation website contains lots of other great examples that you can explore (see, for example, Robert Haas’ translations of Issa & Richard Brautigan’s ‘Haiku Ambulance’.)
As this workshop is a form of adaptation, Raymond Roseliep’s ‘Coleridge’ is an excellent example of a haiku inspired by a literary event:

Step 3. Laura’s medieval-inspired haiku (5 minutes)
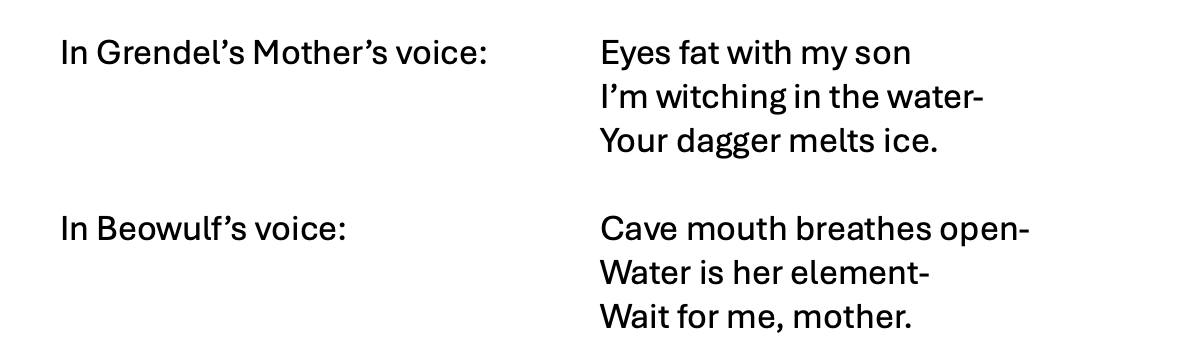
Laura wrote the following haiku inspired by Beowulf’s fight with Grendel’s Mother from the Old English epic Beowulf:
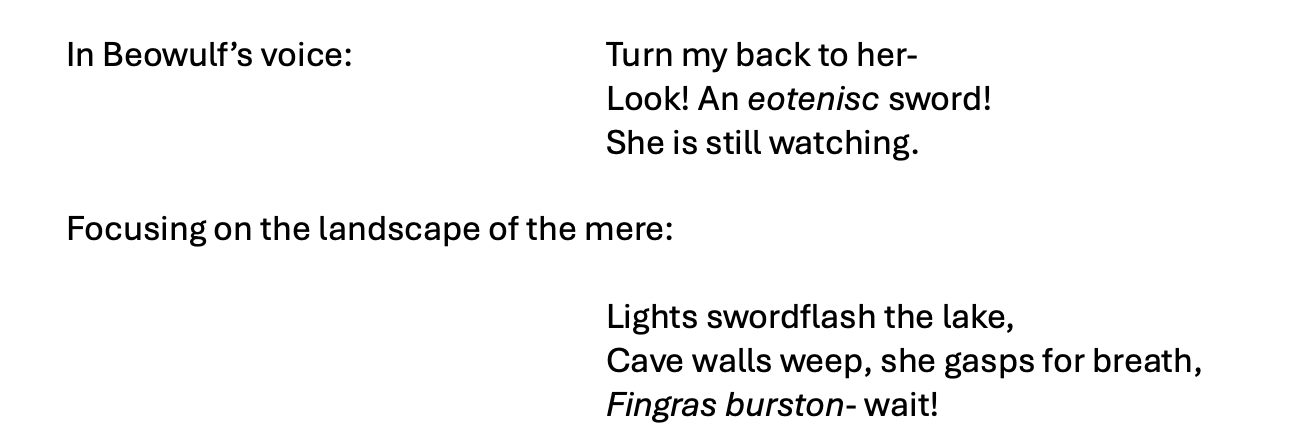
Laura made use of the language of the original source text in the following haiku (eotenisc is Old English for ‘giant’; fingras burston ‘fingers burst’).
Option for development:
If you enjoy the form, you can also write a haiku sequence which forms a narrative. For example, this is Laura’s sequence inspired by the fight in the mere:
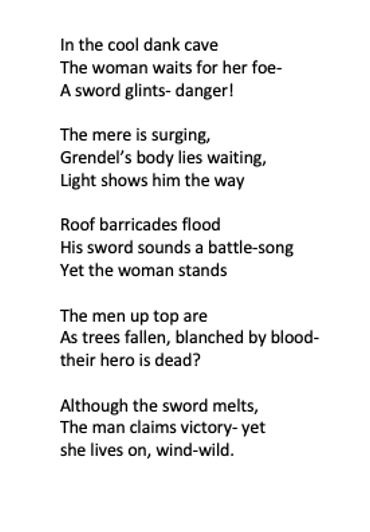
Here, Laura used the three lines of the form in particular ways. You could use the first line for location (‘in the cool dank cave’). You could think about a vertical axis- what is happening above and below your scene? (‘the men up top’). You can also use the three lines to represent the background, middle-ground, and foreground of your scene. (The ‘mere’, ‘Grendel’s body’, the ‘light.’). You could divide lines between characters or objects (the sword, the man, the woman). You can also imitate the style of your source text (here the invented kenning ‘wind-wild’).
Step 4: 15 minutes to write
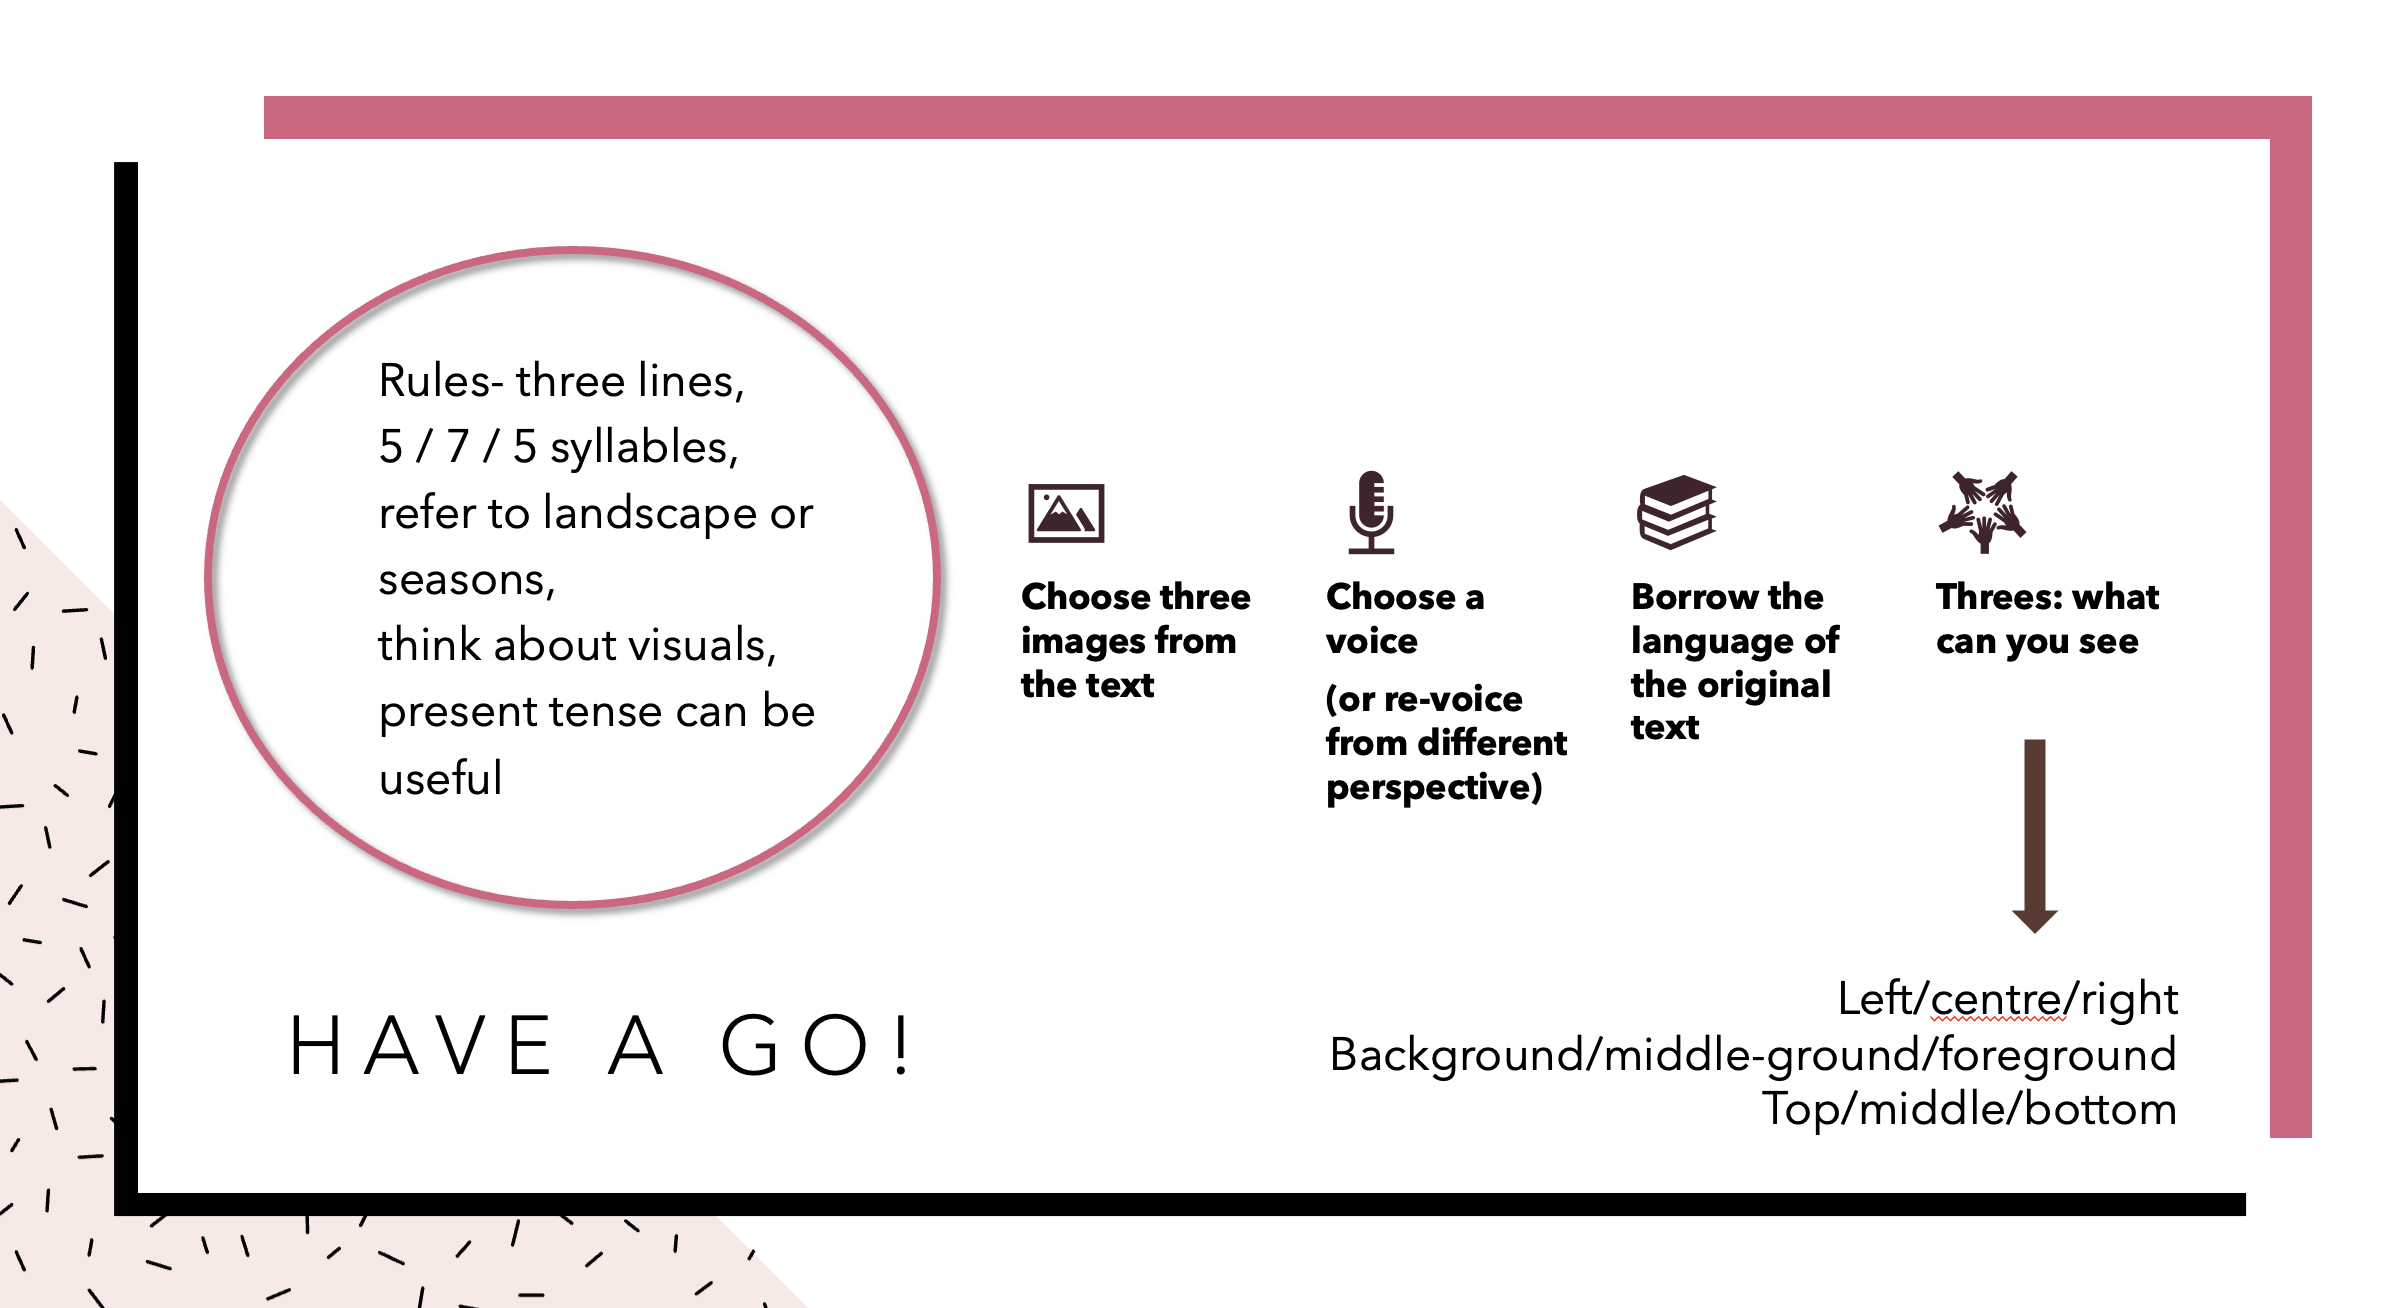
Now that you have read some example haiku, use the rules below and write as many haiku as you can! Don’t worry about making them perfect, just keep going. The more options you have, the more you have to play with in the next part of the workshop.
Part 2: Time to Draw (approx. 20 minutes)
While for many of us, writing falls well within our comfort zones, people often find drawing to be particularly daunting (‘I haven’t drawn since I was 12 years old’ is a frequent refrain in the workshops Kristen has taught over the years – you are not alone!). Conversely, those who already have active drawings practices may find this portion of the exercise destabilizing in another way as it asks you to use different materials and to work quickly and without planning. Please remember throughout this exercise that we are interested in play and process more than the outcome: we want to see what’s possible rather than attempt to generate something ‘perfect.’ Draw with a pen rather than pencil to force yourself to commit to the image, listen to your gut, get loose with your lines, and avoid overthinking as much as possible. Nothing is permanent here: later steps include room for adapting, correcting, and redrawing as needed.
Step 1: Identify images that feel ‘illustratable’ (4 minutes)
Putting your newly generated collection of haiku aside for now, either from memory or from your source text if you have it to hand, highlight or make a list of words/phrases that could be illustrated. This can include concrete things like items and environmental details, facial expressions, or body language as well as more abstract concepts like emotions or movement, which comics can be particularly adept at capturing. Do not get overly concerned about your personal ability to draw these things: the focus is on finding the details that best lend themselves to visualization.
Kristen was adapting Troilus’s Song from Book I of Chaucer’s Troilus and the images that she noted included: a boat, the sea, the winds, Troilus’s wailing, his burning feeling. She worked by highlighting on a copy of the passage itself. If you are working from memory, use these same 4 minutes to list all the visual details you can remember about your passage or source text.
Step 2: Draw four of the images (8 minutes)
On individual post-it notes doodle four of the images, one per post-it. These will function as the panels of our comic (panels can be broadly understood as the individual ‘units’ of a comic that come together to tell a story. We might think about them as functioning similarly to the sentences of a paragraph). Remember that your drawings just need to represent the items (you can think about the stripped down visual style of icons and emojis for inspiration). Don’t worry too much about choosing images that directly correspond to your haiku. Instead, choose images that most interest you or that you feel carry the biggest visual impact. Simplify them to the most basic form possible without worrying too much about things like perspective, background, texture, or detail. If your first try at an image isn’t working, grab another post-it note and try again: change the angle, zoom in or zoom out, pick out a different detail to accentuate.
When drawing these images, it helps to think about ‘cartooning as a form of amplification through simplification…By stripping down an image to its essential “meaning,” an artist can amplify that meaning in a way that realistic art can’t.’ – Scott McCloud Understanding Comics (30)
In this example, Kristen drew: Troilus in his boat, flames to represent burning, the winds blowing the boat, and Troilus’s anxiety expressed through emanata, in this case the two teardrop shapes moving away from Troilus’s head. (Emanata are the shorthand lines and icons used by comics to make visual things like emotional states such as love or anxiety, physical states such as dizziness or drunkness, and movement among others. The example below uses emanata to illustrate Troilus’s inner state as well as the heat of the fire and the movement of the wind.) Notice the details that have been omitted here: the boat is nonspecific, the fire lacks fuel or a source, Troilus has no hair and no clothing (poor guy): his character has been stripped down to his emotional responses.
As you draw these post-its, be sure to leave some blank space for the eventual addition of text. Focusing your drawing on the left or right or the bottom 2/3 of the post-it seems to work best. By the end of this step, you should have at least four illustrated ‘panels’ drawn on your post-it notes.
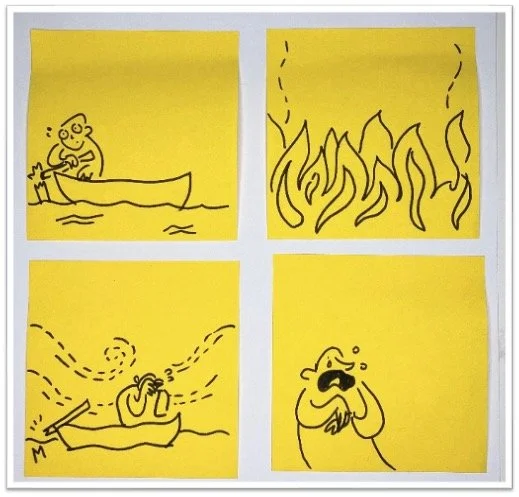
Step 3: Return to your haiku: Which three post-its fit your preferred haiku best? (3 minutes)
Retrieve your collected haiku and place them in front of you alongside the post-it notes you have drawn on. With your images to one side and your sheet of haiku to another, look back and forth between the two and attempt to ‘read’ them together (imagine the lines of your different haiku operating as the text for your post-it panels: you might read them out loud or in your head as you look at the pictures you have drawn). Read through each of the haiku you generated and see which one (or ones) best suit the images you have created. Once you have selected which haiku you prefer alongside these images, experiment further by choosing the THREE images that best suit this particular haiku. Set the discarded image to the side: you can always come back to it later.
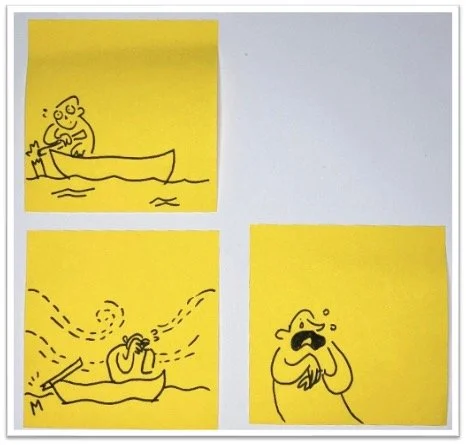
Step 4: Write out your selected haiku (1 minute)
On another post-it, neatly write out the three lines of your haiku as shown in the image (ideally with the sticky part of the post-it on the left-hand side so that when you cut up your haiku to place the lines with the images, you can stick and re-stick them!). Using your scissors, cut your lines apart so you have three individual slips of paper containing one line each to work with.
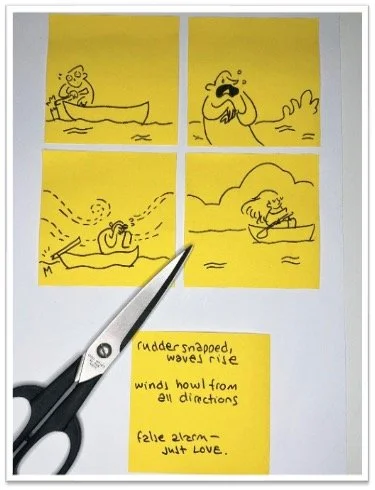
Step 4: Play with your panels! (4 minutes)
You now have three post-it images and three lines of text to mix and match. Play with arranging and rearranging your images while ‘reading’ your haiku as text – is there one order that better suits the haiku you have written? You are not bound by the chronology of your source text here, instead you are experimenting to find what order and combination of text and image most resonate with your interpretation and adaptation. At this stage you might also experiment with including a blank post-it to emphasize something or introduce a silence. Perhaps you feel like a specific image is missing: you can use this time to draw another panel to include it. Maybe you feel some repetition would support the reading you are trying to convey? Draw a second copy of one of your panels on another post-it note and mix it in, observing how this changes the story.
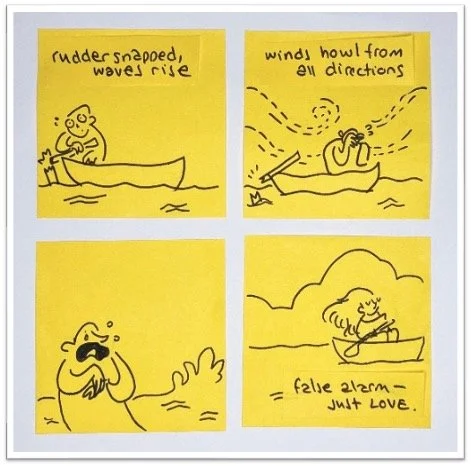
Once you settle on an order, add your text. If you need to redraw a panel, now is the time to do it (either to change the image or to make space for the text). You could order your panels 2 x 2, or 1 x 4 (vertical); 4 x 1 (horizontal comic strip) or return to 3 panels. Now is a great time to add any final details to your already-drawn images that might help the panels to cohere.
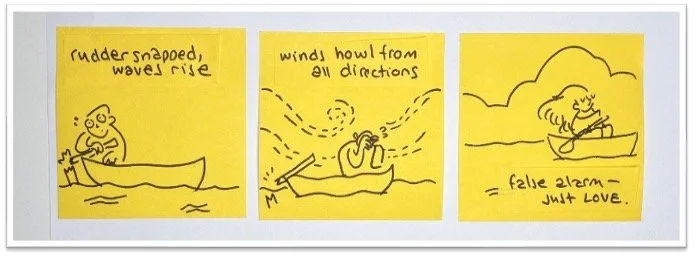
Step 5: Once you are happy with your haiku, glue it to a blank sheet of paper, sign it and admire. (1 minute) Alternatively, you can leave the panels loose and take pictures of the different arrangements you tried if you want to think on the final order further.
And you are finished! Congratulations - you have created your first Modular Haiku Comic. In a classroom setting, this is a great time to have volunteers share their comics, either by setting them out on a table and letting everyone come look or by using a visualizer to project them. (In a classroom setting, it is very important to make this optional because drawing can leave people feeling very vulnerable.)
After the completion of the exercise, the comic you have created can remain as it is or you can use it as a rough draft for a more finished project. You might be interested in redrawing it at a slower pace, in sharing it online, or in scanning it as part of a future collection. If you have completed this activity in a classroom setting, collecting and scanning comics from the group that participants are willing to share and combining them can result in a fascinating anthology that lends itself well to ongoing discussion and becomes a source of pride for the collaborators.
***
If you complete, or teach, this workshop, please let us know! Drop us an email (guildmedmak@gmail.com) or tag us on social media & share your work! (@guildmedmak on Instagram & @guildmedmak.bsky.social)
If you liked this workshop, you might also like to try Kristen’s ‘Six-Word Adaptation Zine’ workshop: worksheet freely available from the Chaucer COMMode website here.
